
1. Introduction
First off, this guide was made possible by the myriad contributions of Akashi, Azazel, Azrael, Jackal, Rhy, and Stella.
Please note that this guide is intended for Viper at Level 100. For information prior to reaching Level 100, please visit the Leveling Guide.
1.1 Overview
Viper (VPR) is a fast-paced melee DPS that alternates between fast dual wield attacks and heavy hitting twinblade attacks. Its core gameplay revolves around the classic builder-spender playstyle, building gauge with its dual wield and twinblade attacks and spending that gauge on a powerful burst window called Reawaken. VPR joins the Melee DPS roster as a Scouting class, and therefore shares gear with Ninja.
1.2 Where to Unlock Viper
Viper can be unlocked in Ul’dah from Worried Weaver at (X: 9.3, Y:9.2). The Quest is called “Enter the Viper,” and picking it up requires having at least one level 80 Disciple of War or Magic, as well as the purchase of the Dawntrail expansion.
1.3 Skills Overview
For a complete list of Viper skills and their tooltips, please see the Skills Overview page.
2. Viper Combos
Viper’s core gameplay is based around a branching series of combos that apply personal damage and haste buffs. VPR has two primary types of combos, dual wield and twinblade, and each type has both a single target and Area of Effect (AoE) combo. Each combo also generates Serpents Offerings gauge, which will be discussed later in this guide.
2.1 Dual Wield Combos
Dual wield combos execute attacks that use two separate swords, one in each hand. Dual wield attacks have a standard GCD speed of 2.5s (2.12s with 15% haste buff) with no skill speed.
2.1.1 Single Target
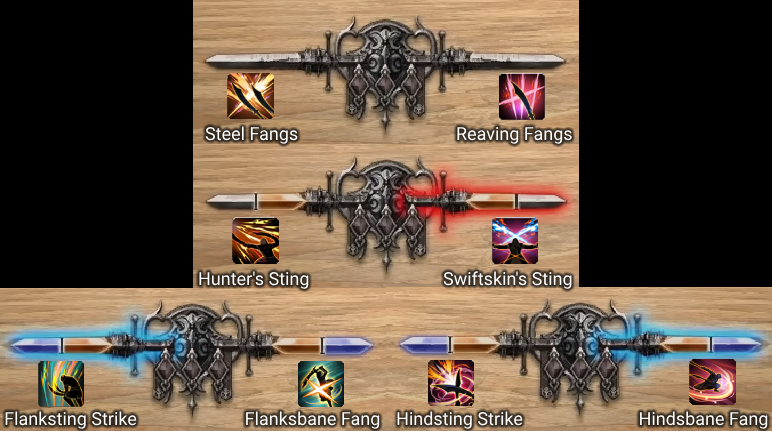
Viper’s single target dual wield combo is a branching path system made by selecting one of two options for each combo hit. Players will start the combo chain with either Reaving Fangs or Steel Fangs. Steel Fangs grants Honed Reavers, increasing the potency of the next Reaving Fangs by 100. Reaving Fangs grants Honed Steel, increasing the potency of the next Steel Fangs by 100. This means that Steel Fangs and Reaving Fangs will be alternated each combo to keep each other buffed. It does not matter which is started with the first time, as their buffed and unbuffed potencies are the same: 200 unbuffed, and 300 buffed.
Selecting either option now allows the player to choose between Hunter’s Sting or Swiftskin’s Sting. Hunter’s Sting applies Hunter’s Instinct, increasing the Viper’s damage dealt by 10% for 40 seconds. Swiftskin’s Sting applies Swiftscaled, decreasing the Viper’s weaponskill recast time and auto-attack delay by 15% for 40 seconds.
Selecting Hunter’s Sting gives the player access to two combo finishers, Flanksting Strike and Flanksbane Fang. Selecting Swiftskin’s Sting grants access to the other two combo finishers, Hindsting Strike and Hindsbane Fang. Each combo finisher also grants a buff that makes a different combo finisher do more damage. Flanksting Strike buffs Hindsting Strike, Hindsting Strike buffs Flanksbane Fang, Flanksbane Fang buffs Hindsbane Fang, and Hindsbane Fang completes the cycle by buffing Flanksting Strike.
At first glance, this may seem like an overwhelming amount of things going on for one combo chain, but the combo finishers buffing a specific other finisher in the cycle makes this an extremely linear pattern. Players will always go through the cycle in the order of Flanksting Strike -> Hindsting Strike -> Flanksbane Fang -> Hindsbane Fang -> repeat from Flanksting Strike. Please note that the cycle starts from whichever combo finisher you did for your first dual wield combo and does not need to start from Flanksting Strike. This was just used as an example.

Note: the buff icons shown are the buffs *granted* by pressing that ability, and not the buff that increases the potency of that ability. I.e. Flanksting Strike gives the buff shown that increases the potency of Hindsting Strike by 100.
As shown in this flowchart, players will choose either Reaving Fangs or Steel Fangs depending on which Honed buff they have. These will always be alternated. Next, players will select Hunter’s Sting or Swiftskin’s Sting. Due to the nature of the combo finisher buff, players will always alternate this hit to have access to the combo finisher that is currently buffed. Finally, players will select the combo finisher that is currently buffed. Selecting any combo finisher also allows for a follow up oGCD called Death Rattle, regardless of if you selected the buffed one or not. Always press the buffed one for more damage, but you will not lose a Death Rattle if you mistakenly press the wrong choice.
The game systems do a very good job of guiding the player to select the correct buttons in order to be able to use the currently buffed combo finisher. While Honed Steel or Honed Reavers is active, which is the buff that makes Steel Fangs or Reaving Fangs 300 potency intead of 200, the correct option will have combo ants around it. After pressing Steel Fangs or Reaving Fangs, the correct choice for Hunter’s or Swiftskin’s Sting will have also combo ants around it. Pressing the second action with the combo ants will then trigger one of the two available combo finishers to have combo ants, which will indicate which finisher is the currently buffed one. If the non-glowing second combo action is selected, it is no longer possible to press the buffed combo finisher, which will result in 100 potency lost. This means players will be able to simply press the glowing button in order to flow through the combo chain correctly.
Please note that before completing the first combo and gaining the Honed Steel/Reavers buff and the combo finisher buff, neither Steel Fangs nor Reaving Fangs will glow, indicating that you are free to press either one. Similarly, since there is no active combo finisher buff, both Hunter’s Sting and Swiftskin’s Sting will glow, indicating that you can freely choose either one. Once Hunter’s or Swiftskin’s Sting is pressed, both combo finisher options will be glowing to indicate you can freely choose either one. While the Honed Steel/Reavers and combo finisher buffs are active, only the correct button to press will be glowing.
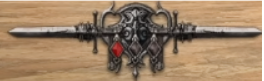
Furthermore, the Vipersight Gauge is there to guide you through which combo you should use. As shown above, when there is no combo active, and no Honed Steel or Honed Reavers buffs active, both swords will be gray and will not have a glow. If Honed Steel/Reavers is active, the left sword will have a yellow aura to indicate that Steel Fangs should be pressed, and the right sword will have a yellow aura to indicate that Reaving Fangs should be used. The yellow glow is not pictured above, and will be added later.
After using the combo starter, each sword will have half of it glow orange to indicate that the Viper is on the second combo in the chain. Either the left or right sword will have a red aura around it, which indicates which of the two middle combo actions is the current one that should be pressed to get to the correct combo finisher. The first time through, both sides will have the red aura, indicating that either of the two actions may be used.
After pressing a middle combo action, the gauge will have both swords glow half blue and half orange, indicating that the combo finisher is the next action in sequence. One side will have a blue aura, indicating which specific combo finisher should be pressed. The first time through, both sides will have the blue aura, indicating that either of the two actions may be used. This gauge is purely a visual representation of what the combo ants on the abilities show as the sequence progresses. Simply follow the combo ants or the Vipersight gauge to correctly execute the combo chain.
2.1.2 Area of Effect (AoE)
Dual wield AoE is much simpler, and has only six total buttons to choose from: two starters, two middle hits, and two finishers. Similar to the single target version, this combo starts with a choice of Steel Maw or Reaving Maw. Each starter gives the same buff a their single target counterpart, Honed Steel and Honed Reavers. For the AoE versions, the potency increase is 20 instead of 100. The next hit is a choice of Hunter’s Bite or Swiftskin’s Bite. The former applies Hunter’s Instinct, and the latter applies Swiftscaled. The combo finisher is a choice of Jagged Maw or Bloodied Maw. Similar to the single target combo, using one combo finisher buffs the other, creating an AoE combo cycle of alternating the first, second, and third combo actions. Successfully completing the combo grants an AoE oGCD called Last Lash. Below is a visual representation of this combo.

Similarly to how the Vipersight gauge guides you through the single target version, the gauge also guides you through the correct buttons to press for the AoE version in order to hit the correct combo finisher.
2.2 Doubleblade Combos
Official localization calls these “doubleblade combos,” but that is confusing terminology when used with dual wield combos. For clarity they will be called twinblade combos instead. Twinblade combos execute actions using both swords attached at the hilts to form a single, double bladed weapon. Twinblade attacks have a longer GCD of 3.0s (2.55s with 15% haste buff), with no skill speed. Twinblade combo starters are on a 40s cooldown with two charges, and share a cooldown and charges with each other (i.e. using Vicewinder also uses one charge Vicepit and vice versa).
2.2.1 Single Target
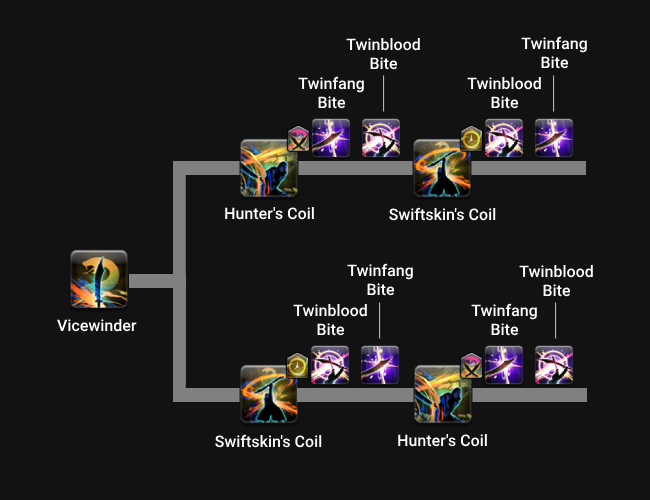
The single target twinblade combo starts with the skill Vicewinder. Vicewinder allows for the execution of either Hunter’s Coil or Swiftskin’s Coil. Hunter’s Coil also applies Hunter’s Instinct, increasing the Viper’s damage dealt by 10% for 40 seconds. Swiftskin’s Coil applies Swiftscaled, decreasing the Viper’s weaponskill recast time and auto-attack delay by 15% for 40 seconds.
Hunter’s Coil allows for the immediate execution of two oGCD skills, Twinfang Bite then Twinblood Bite. Swiftskin’s Coil allows for the immediate execution of the same two oGCD skills, but in the opposite order: Twinblood Bite then Twinfang Bite. Pressing the oGCDs in the incorrect order will result in 50 potency lost for each skill.
After selecting Hunter’s Coil or Swiftskin’s Coil, the opposite skill becomes available. The image below shows a visual representation of how the combo works.
2.2.2 Area of Effect (AoE)
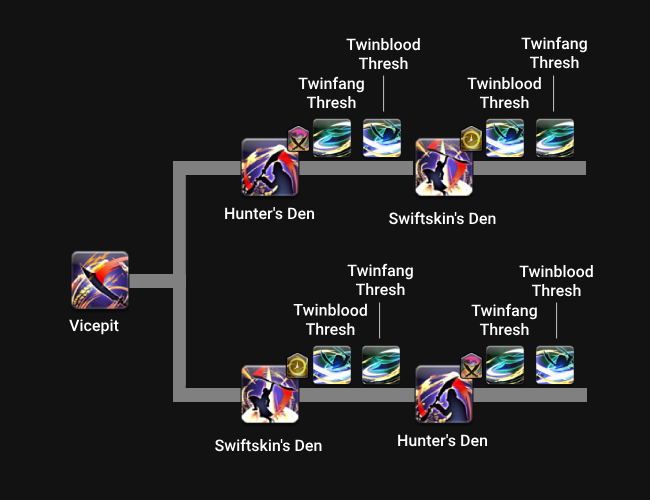
The twinblade AoE combo functions exactly like its single target counterpart. Start the combo with Vicepit. Next, use either Hunter’s Den or Swiftskin’s Den, the former applying Hunter’s Instinct and the latter applying Swiftscaled. Finally finish the combo with whichever of Hunter’s and Swiftskin’s Den that was not used for the second hit. Hunter’s Den will allow execution of Twinfang Thresh then Twinblood Thresh, and Swiftskin’s Den will allow execution of Twinblood Thresh then Twinfang Thresh. Like the single target versions, be sure to hit the oGCDs in the correct order to avoid a potency loss. Below is a visual representation of this combo.
2.3 What Breaks Combos
Combos are broken by one of two things: expiring after not being continued for 30 seconds, or pressing another button that breaks the currently active combo chain.
The dual wield combo is not broken by any other part of Viper’s kit except for the AoE version while the single target combo is active, and vice versa. You can freely use Vicewinder/Vicepit combos, Reawaken, Uncoiled Fury, and Writhing Snap during an active dual wield combo at no penalty as long as the time since hitting the last combo action does not exceed 30 seconds.
The twinblade combo, however, is broken by everything else that is not Uncoiled Fury or Writhing Snap. This means that is not possible to use Reawaken during an active Vicewinder/Vicepit combo without breaking the combo!
Please note that Reawaken and Uncoiled Fury are discussed in a later section.
3. When to Use Single Target or AoE
The only abilities that Viper needs to make a decision whether to use the Single Target or AoE forms are the dual wield and twinblade combo actions. All other damaging abilities have natural AoE damage, with the exception of Writhing Snap.
For both the dual wield and twinblade combos, it is only a gain to use the AoE forms when fighting three or more targets. For one or two enemies, continue to use the single target versions.
4. Viper Positionals
Viper has six abilities with positional requirements. Each positional increases the potency of its respective ability by +60 for dual wield finishers and +50 for twinblade abilities when successfully executed from the required direction.
| Icon | Skill Name | Positional |
|---|---|---|
 | Hunter’s Coil | Flank |
 | Swiftskin’s Coil | Rear |
 | Flanksting Strike | Flank |
 | Flanksbane Fang | Flank |
 | Hindsting Strike | Rear |
 | Hindsbane Fang | Rear |
For the dual wield combo, both flank positionals will always follow Hunter’s Sting, while both rear positionals will always follow Swiftkin’s Sting. Due to the nature of the combos, players will always alternate rear/flanks during dual wield combos. Twinblade combos allow you to choose which positional you want to do first each time.
5. Viper Gauges
Viper has two gauges, the Serpent Offerings gauge and the Rattling Coil gauge.
5.1 Rattling Coils
One Rattling Coil is generated when using either Vicewinder or Vicepit, or from using Serpent’s Ire. Rattling Coils are located on the bottom of the Vipersight Gauge. For each Rattling Coil stored, a red gem will light up, with a maximum of three Rattling Coils able to be stored at once.
Rattling Coils are spent to use the ranged ability Uncoiled Fury. This ability has a GCD recast timer of 3.5s (2.97s with 15% haste buff) and allows for the execution of two follow up oGCDs, Uncoiled Twinfang then Uncoiled Twinblood. These oGCDs must be used in this order, as using Uncoiled Twinfang grants the buff that allows for the use of Uncoiled Twinblood. Uncoiled Fury can be used to keep the GCD rolling during melee downtime mechanics, and will also be used as rotation filler even in full uptime due to its high potency relative to time ratio.
5.2 Serpent’s Offering Gauge
The Serpent Offerings gauge is made of two parts. The gauge counter, which displays your current total of Serpent Offerings, and the Anguine Tribute counter, which displays how many actions you can use while under the effect of Reawaken. The latter part of the gauge remains inactive until Reawaken is activated. Serpent Offerings are generated from dual wield combo finishers (+10 per finisher), or from the second and third hits of the twinblade combos (+5 from each hit, +10 total for each twinblade combo). As offerings are generated, the gauge gradually fills with a red liquid which becomes blue upon reaching 50 offerings.
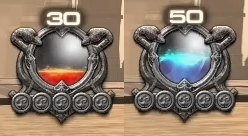
After reaching 50 or more Serpent Offerings, the player can enter Reawaken. This powerful burst window costs 50 Offerings to enter, or is free to enter when under the effect of Ready to Reawaken, granted by Serpent’s Ire. Reawaken makes the Anguine Tribute counter glow with five blue orbs, indicating that the Viper can use five Reawaken abilities. For each ability used, one orb becomes inactive again.
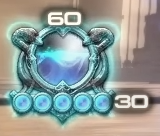
The number to the right of the Anguine Tribute counter indicates the amount of time remaining to use all Anguine Tributes before the effect of Reawakened expires.
Activating Reawaken turns Viper’s dual wield and twinblade combo actions into First, Second, Third, and Fourth Generation. Reawaken itself gets replaced with the Reawaken finisher, Ouroboros. Each hit of First through Fourth Generation grants access to an oGCD ability called First through Fourth Legacy that must be used after each respective Generation hit. This makes the full Reawaken combo as follows:
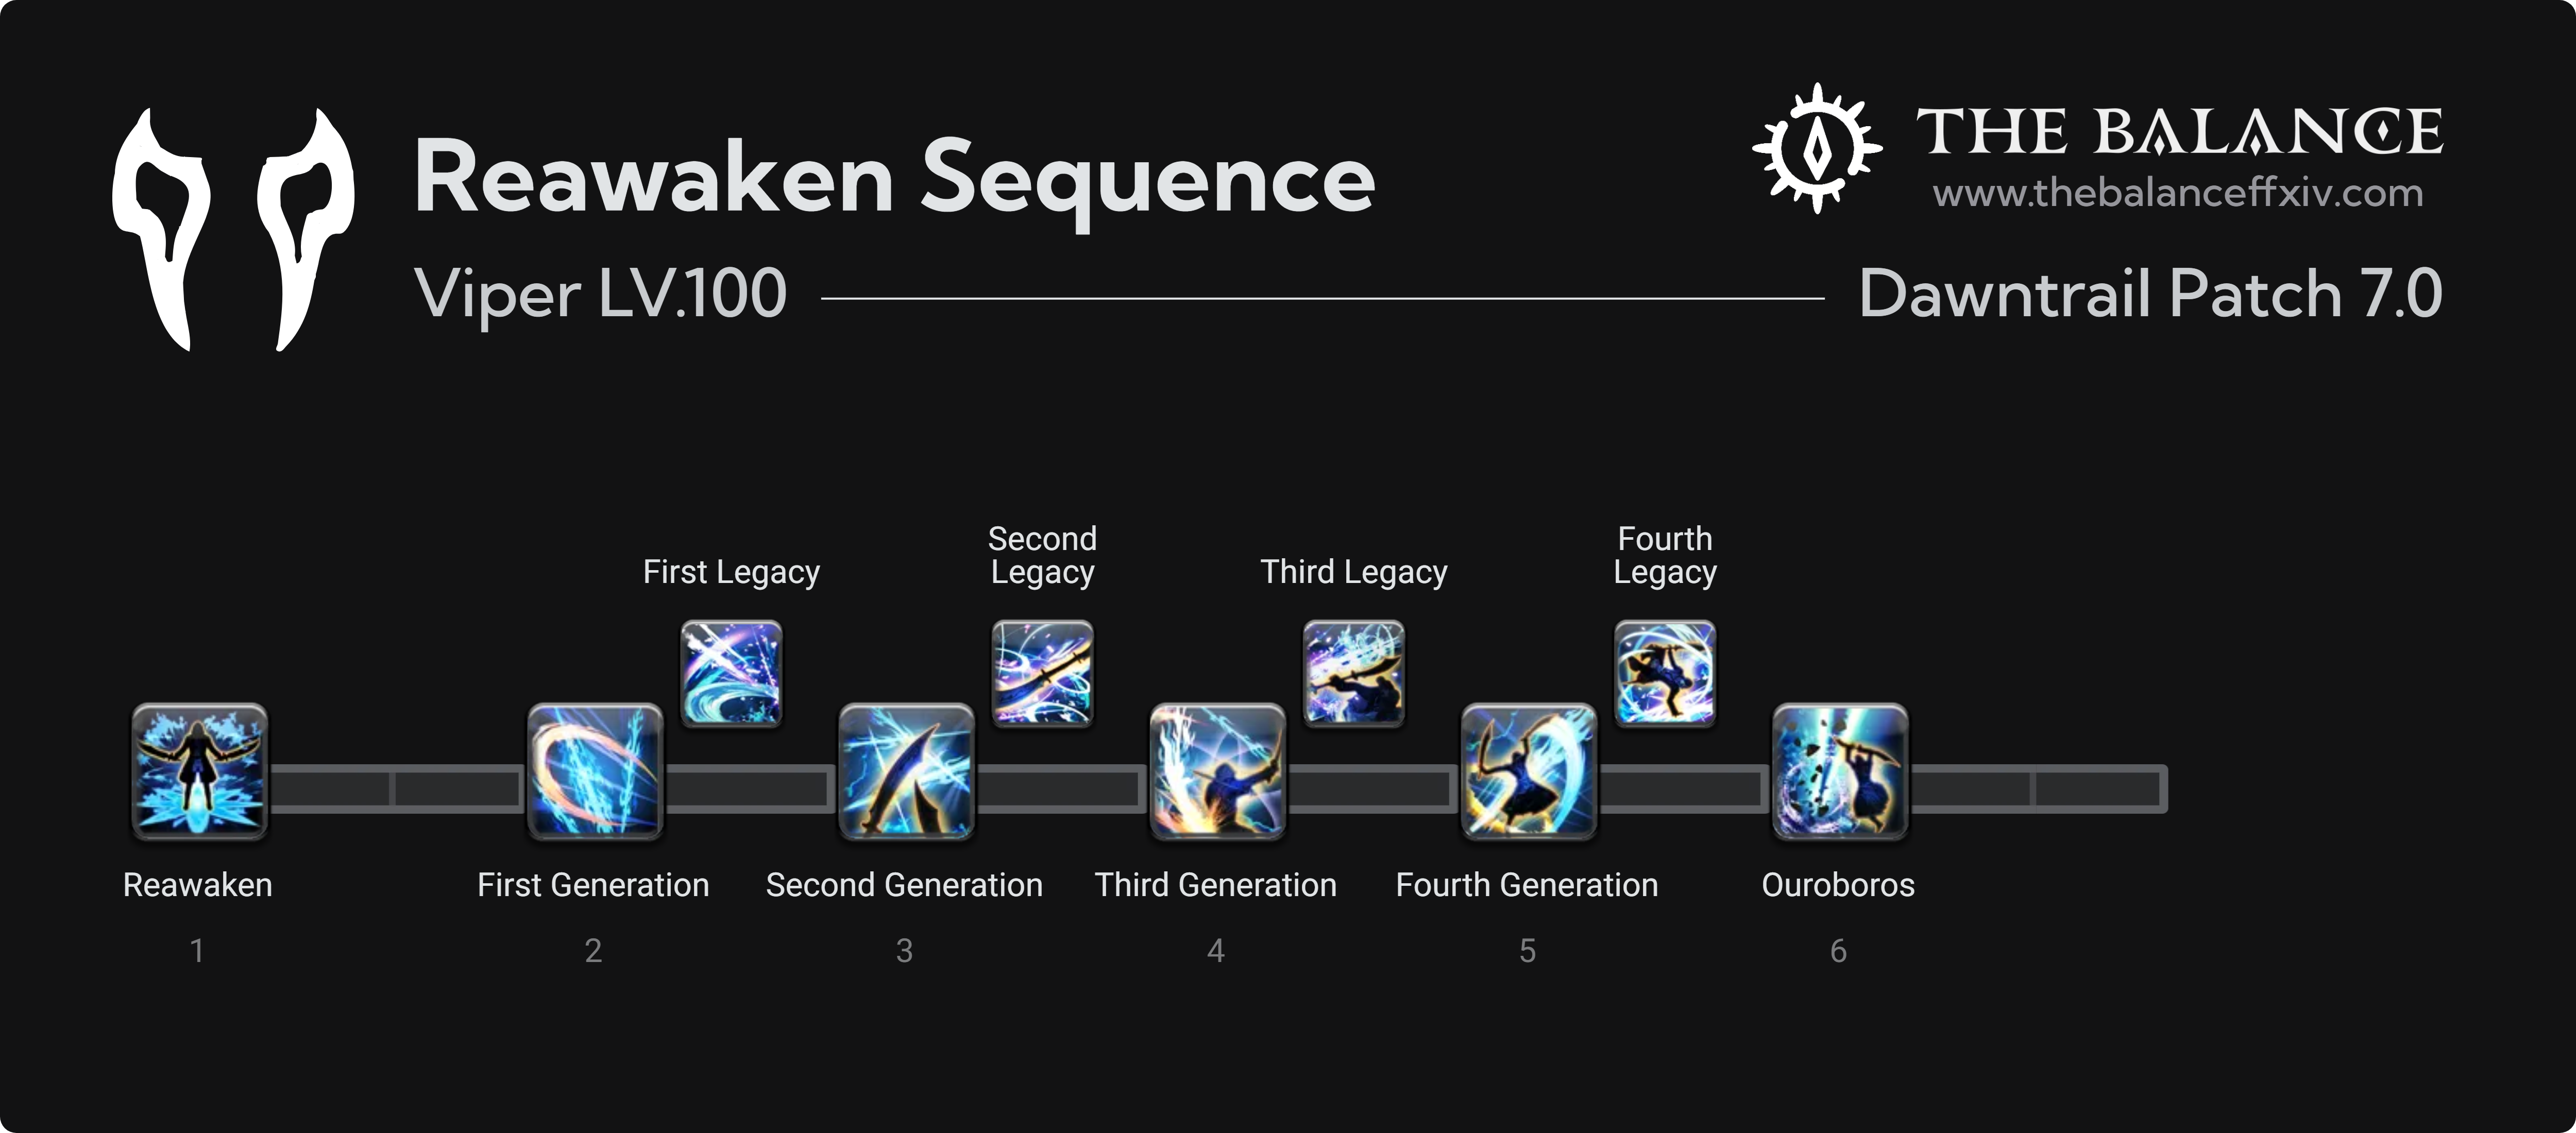
The whole Reawaken combo takes 13.2s (11.22s with the 15% haste buff) with no skill speed, as Reawaken has a base recast of 2.2s, each Generation GCD has a base recast of 2s long, and Ouroboros has a base recast of 3.0.
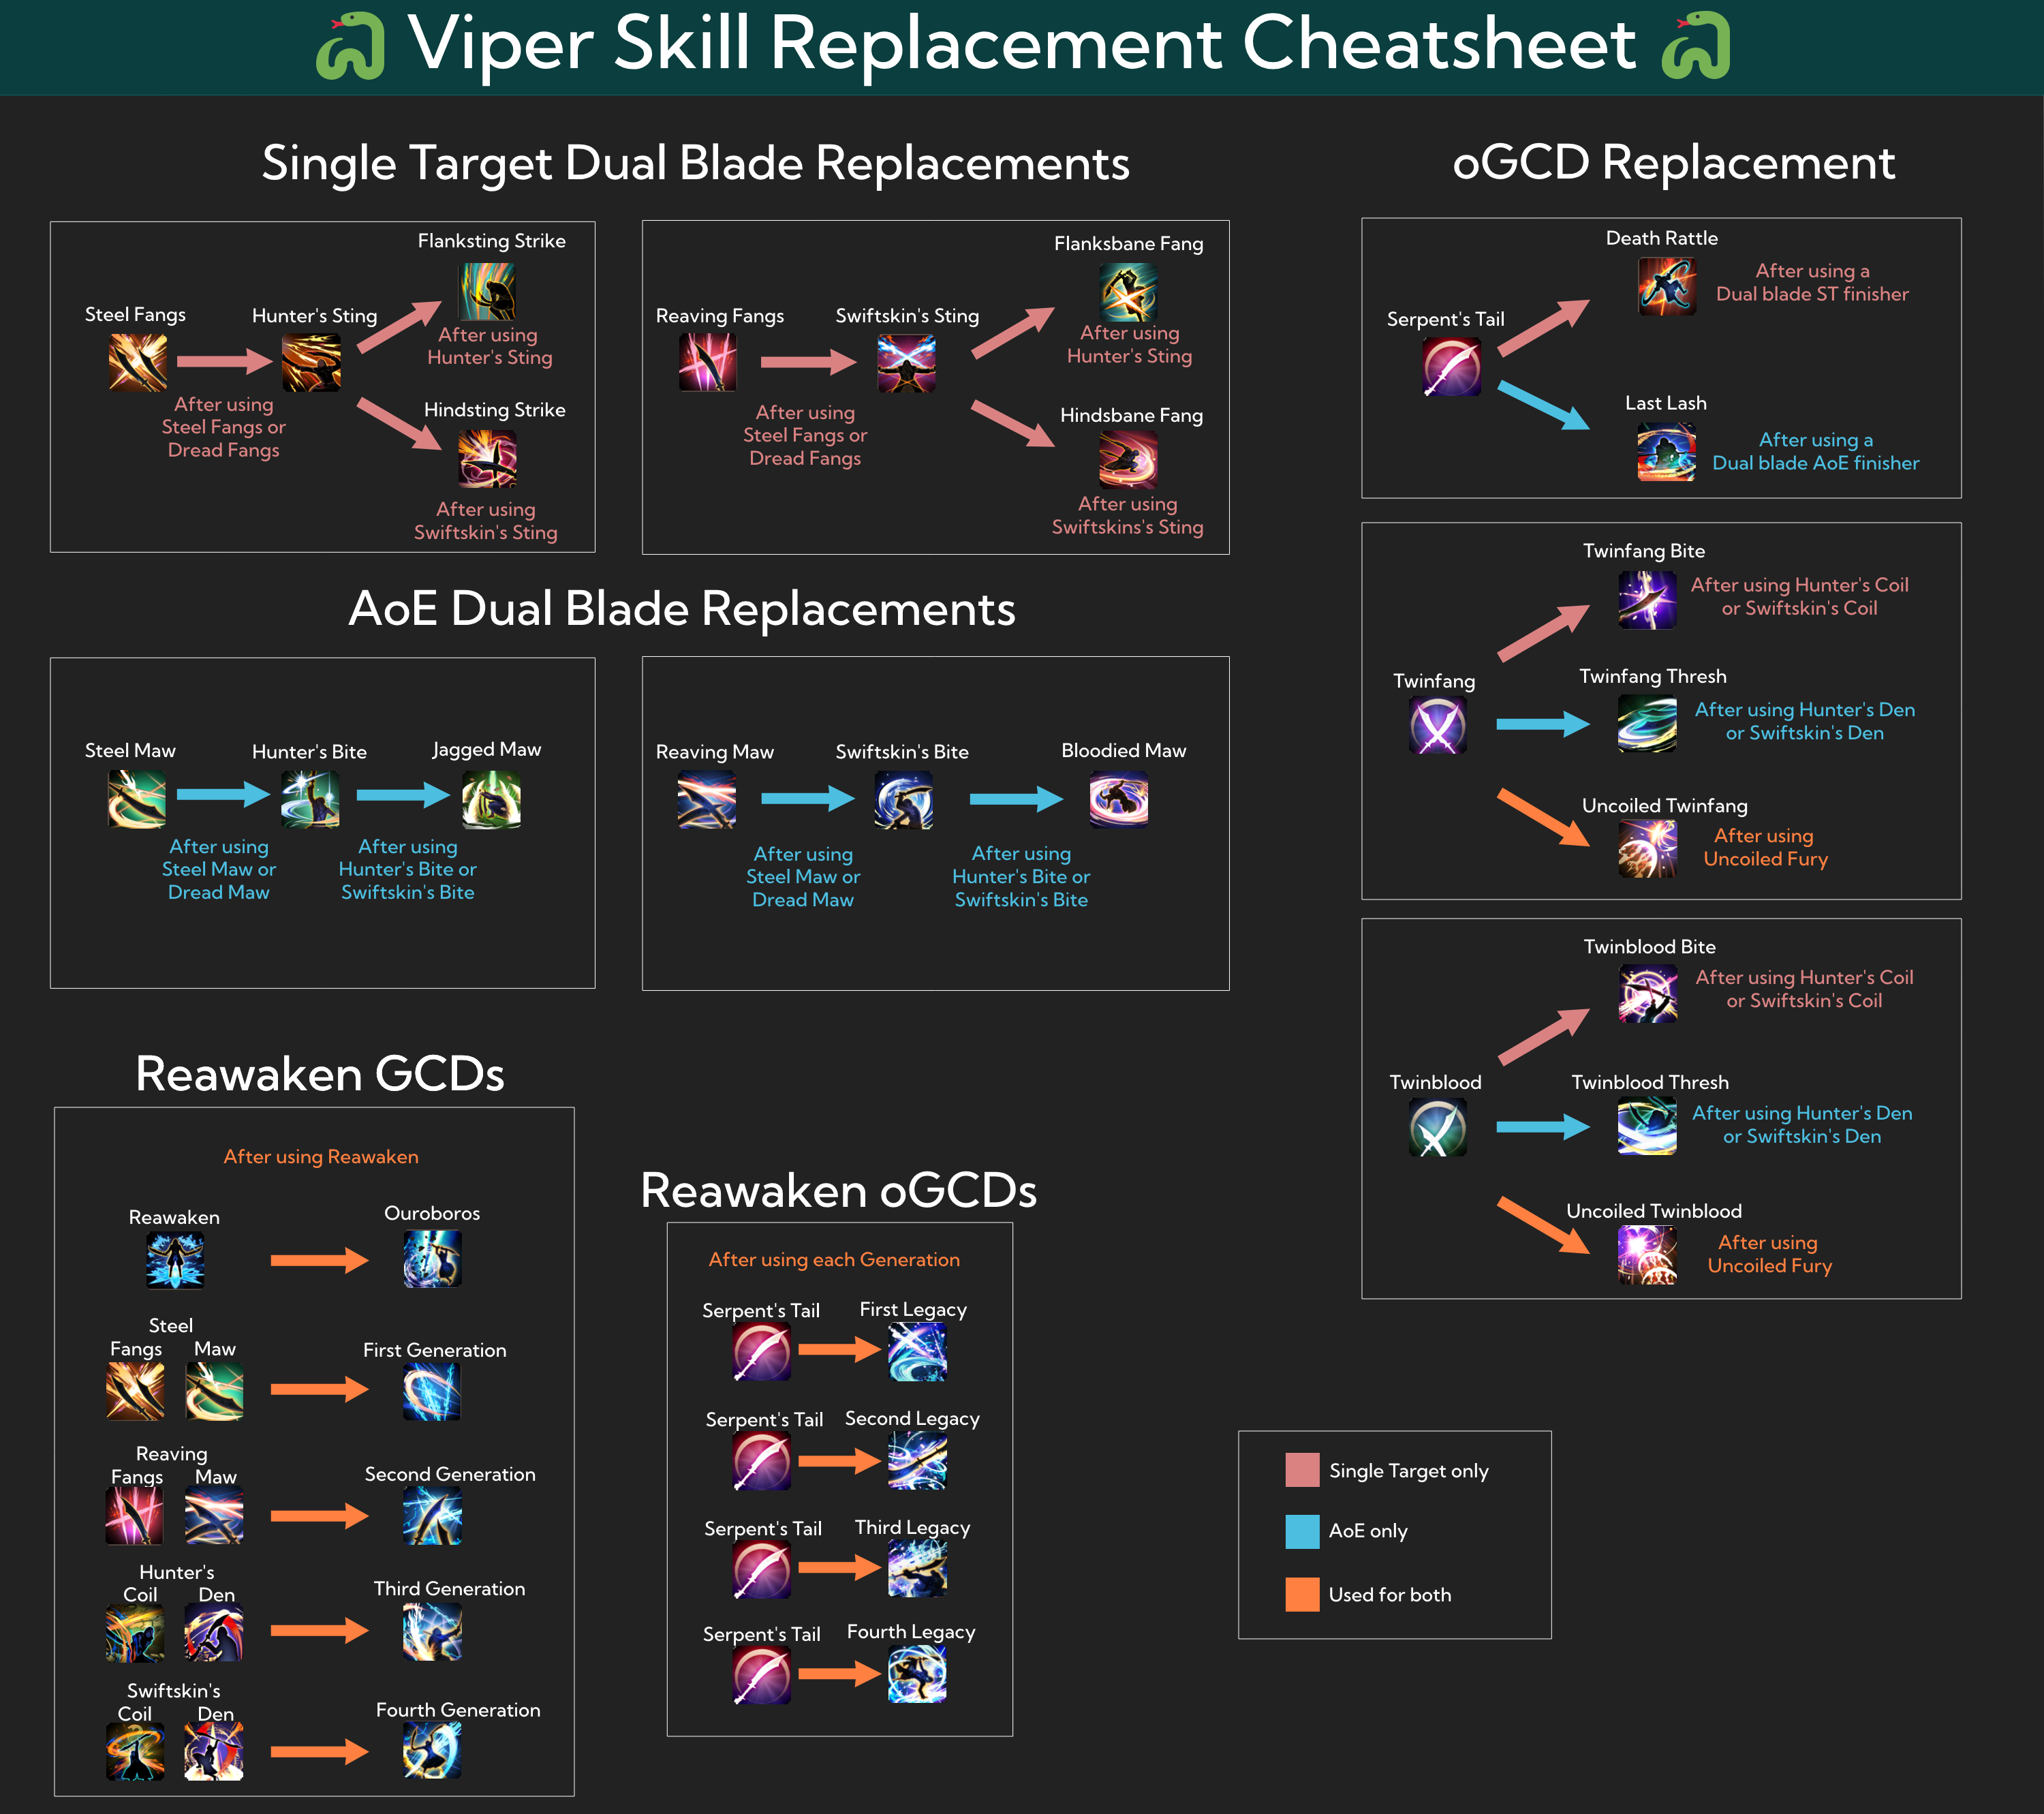
6. Button Replacements
It might be tricky to understand what button replaces what on this job, so please see this visual made by Rhy to help understand what is happening.
7. Viper Basic Rotation
7.1 Opener(s)
Standard Opener

Click here for a full size image.
7.2 Always Be Casting
In FFXIV there is one thing that is absolutely fundamental to every combat job. The ABCs of FFXIV: Always Be Casting. This does not necessarily refer to casts in the literal sense of using abilities that have cast times before activating. Instead, what this means is to always be “rolling” your GCD clock. Every time a weaponskill or spell is used, it will trigger a cooldown clock on every other skill that is on the Global Cooldown (GCD). There should never be a point in time where that clock stops spinning when there is something that can be attacked. Do not underestimate the importance of this! If you have a 10 minute long fight, and you have 90% GCD uptime, that means for 10% of the fight your GCD was not rolling. This translates to 60 whole seconds of GCD downtime. That’s a full minute of doing 0 DPS! It is often better to press things in the incorrect order than to not press anything. Some damage is better than no damage.
7.3 Rotation Priorities
Viper rotation can be presented in its simplest form as a priority system.
Keep Hunter’s Instinct and Swiftscaled active at all times.
Use Serpent’s Ire as soon as it is ready.
Enter Reawaken and spend all Reawakened actions following Serpent’s Ire, using the Ready to Reawaken buff.
Use Reawaken and spend all Reawakened actions when at or above 50 Offerings.
Use Vicewinder in single target and Vicepit in AoE, and their follow up abilities, before they reach 2 stacks. These can essentially be used on cooldown outside of the burst window, provided you do not overcap on gauge, or cause the combo finisher or Honed buffs to fall off as a result.
Spend Rattling Coils as you get them.
- Save one at all times to cover potential disengages, but spend them before using Serpent’s Ire as it will grant another. Avoid overcapping Coils and spend them before the end of the fight unless you can Reawaken instead.
Rotate through the dual wield combo cycle, ensuring the correct actions are used to execute the buffed finisher.
When fighting three or more enemies, continue to follow this priority system, but use the AoE versions of the dual wield and twinblade combos.
8. The Next Level of Viper Rotation
Having a firm grasp of the concepts above will be more than enough to get players through more casual content like Normal Raids, Dungeons, and Extreme trials. Playing the job as a pure priority system is not optimal and anyone looking to contribute more to their team with better DPS should understand this. In higher level content such as Savage Raids and Ultimate Raids, players are expected to know how to play their job with party buffs in mind in order to maximize the damage the party can do. If you feel like you’ve got a firm grasp of the concepts presented in this guide, head over to the VPR Intermediate Guide to learn how to play VPR into party buffs and optimize its damage.
Here is a sample of some of the things discussed in the Intermediate Guide:
- The two minute burst window (how to play in party buffs)
- Planning for downtime/melee disconnects
- Potion usage
- and more!
- Have any questions?

 discord.gg/thebalanceffxivAuthors
 Torael Vadis
 @torael_valdis